Many people are confused when it comes to applying for a Russian visa. In fact, the process is fairly simple. You just need to know what to do and in what order. Here we explain everything in every detail.
- The first thing you need to get when applying for a Russian visa is the Russian visa support documents (also called "invitation").
- Second, after you received your visa support, you should fill out your Russian visa application form online available on the Russian Ministry of Foreign Affairs (MID) website visa.kdmid.ru. The application for the Russian visa should be filled out after you get your visa support (or invitation), because it must have the same details as the invitation (otherwise you may be refused your visa). Below we explain how to fill out this form, step by step, as it's sometimes too complicated for travelers to understand what the bureaucrats really want...
- Finally, once you have your visa support (invitation) and once you printed out the visa application form, you can apply for a Russian visa at a Russian consulate or at the visa processing center they recommend. In order to do that, you need to bring (or send by post, if allowed) your visa support documents, passport, two photos, the application form and travel insurance for the duration of your stay (not needed if you're a UK citizen).
In case you
don't want to go to the Russian consulate yourself you can use the services of an authorised Russian consulate partner in the country you are applying. If applying in
USA, use
ILS center, for
UK use
VFS Global, for
France use
VHS France, for
Germany use
VHS Germany, for all
other countries check the list of available countries on use
ILS center website.
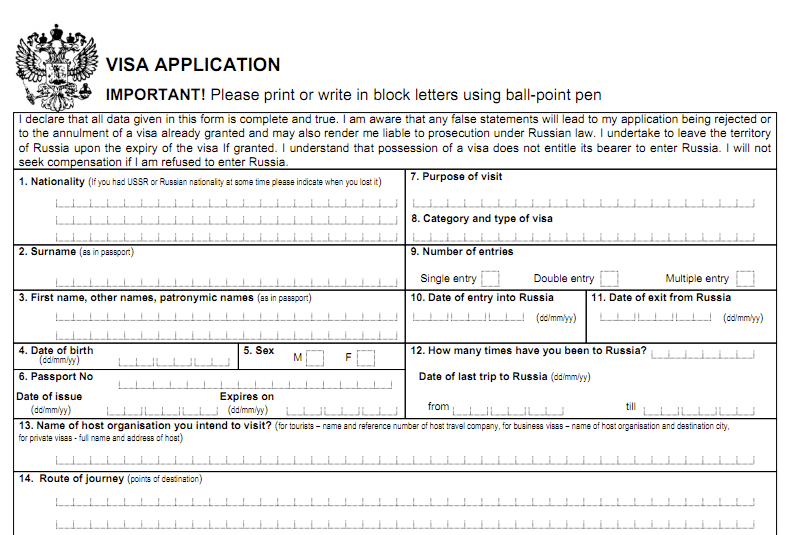
For your convenience you can also look at the old application form
right here in PDF format, so you know what questions you will be asked in the online form. But please, use the online application form above to avoid any mistakes and confusion.

If you are a UK citizen, you should know that since January 2009 the Russian consulate decided to outsource all application services to VFS visa agency, so you don't need to go to the consulate to get your visa. Such centers are starting to appear in other countries, like France, and USA, so check the Russian consulate's website in your country to see whether you should apply directly at the consulate or at the visa processing center they recommend.
Thus, the Russian visa application process consists of 3 simple steps:
- get the visa support (invitation),
- fill out the online application form and print it out, and then
- bring it along with the other documents (passport, photos, insurance) to the office of the visa processing agency recommended by your Russian consulate.
Update (2019): Since October 2019 citizens of the EU countries can get a special e-visa to Russia that does not require visa support letter or trips to the visa center or the consulates. This type of visa is only valid for 8 days and you can only stay in St. Petersburg, St. Petersburg region or Kaliningrad region. Citizens of Japan, China and some other Asian countries can also use the e-visa to visit the Far East (Vladivostok, Kamchatka, Sakhalin). Learn more about it in our guide on how to apply for an e-visa to Russia.
Need a Russian Visa? Order online, no reservation ties, ready in 24 hours:
click to load the russian visa application form
How to Fill Out the Russian Visa Application Form
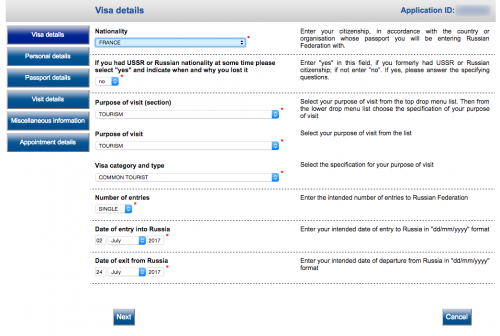
Once you obtained your visa support documents, you need to go to visa.kdmid.ru and fill out the actual Russian visa application. There is nothing particularly special about the form itself. One important thing is that you always need to make sure that the information you provide in the Russian visa application form is the same as in your visa support documents – otherwise you won't get your visa.
Let's start from the first field that can get confusing: the
purpose of your visit (field 7 on the PDF form).

Here you should say exactly the same thing as your invitation. So if you're getting a tourist invitation, the application form should also say "tourism". If you write "visiting friends", for example, then the consulate might ask you why you didn't apply for a private visa instead (and then you'll have to have someone in Russia queue in a local police station to get you the private invitation and wait for 1 month until it's ready and arrives you to by post).
For the
dates of entry and exit from Russia (fields 10 and 11) you should put t
he same dates as are written on your invitation. Remember, you can enter and leave Russia
any time within this time span, so give yourself 2-3 days extra. Also, the chances of getting a visa are almost 100% if your travel time span is 2 weeks. If it's longer, the consulate might ask additional questions (if we're talking about the tourist visa).
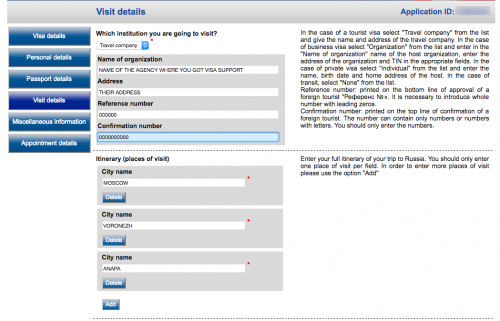
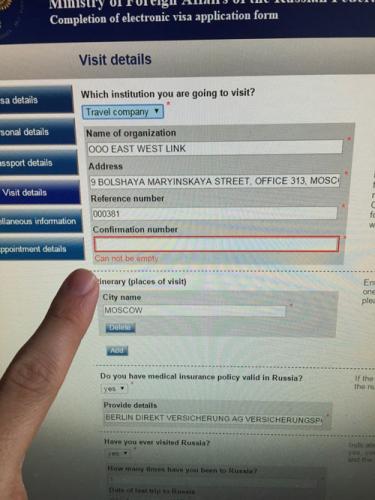
When asked the name of organization you're visiting (field 13) you should put in the name of the company that issued your visa support (invitation) (e.g. OOO EAST WEST LINK) and their reference number (usually a 6-digit number).

It's all specified in the visa support documents and if in doubt, contact the visa support company directly (but usually it's super clear). Never put WayToRussia or any other name of the website in there even if you got your visa support through this site: the actual invitations are issued by the legal entities that advertise their services through our site, so you should specify their legal name (usually starts with OOO which means "Inc." or "Ltd" in Russian), not the name of the website (we are a travel guide, not a travel agency). When you get your visa support documents, they'll have the name of the company that issued your visa support (they are the inviting party), its address, telephone and reference number – you should put this information into your application form.
Another question that is asked on electronic Russian visa applications is the confirmation number. It's not the same as the reference number (of the inviting company), it's actually the number of visa support / invitation / confirmation itself. This number is provided at the top of your invitation (visa support or приглашение #, for example). Put this number in the confirmation number field (see the picture below).

The route of journey (field 14) of your Russian visa application should list the same cities listed on your invitation (visa support). They won't actually be shown on the actual visa, so once you arrive to Russia you could of course travel where you want (excluding restricted territories, which you won't find anyway :).
For the health nsurance (field 15), if you're a citizen of UK there's a reciprocal agreement whereas your NHS insurance is valid in Russia, so tick Yes. If you are from EU or USA, you need to make sure your health insurance is valid in Russia and that it's issued by a major company (AXA, Allianz, etc – usually listed on the consulate's website). When in doubt, bring your insurance documents along to the consulate, so you can prove it is valid in Russia. You can get your travel health insurance valid in Russia through the providers recommended on our travel insurance page. Alternatively, Google health insurance and buy one that's valid for the duration of your trip (usually $10 / week).
After you get your application form filled in, you can book an appointment to get your Russian visa through one of the officially authorized Russian visa centers around the world: in
USA and Canada, in
Europe, in
Asia and in
UK. You can also try to apply directly through the
consulate, although not all of them accept documents for visa support, so you might have to use the visa center to apply.
So, hopefully everything is clear and you can always leave your question below or on our Facebook Page or on Twitter @waytorussia and we'll help you with it.
If you don't have the visa support yet, you can apply for it here.
Need a Russian Visa? Order online, no reservation ties, ready in 24 hours:
click to load the russian visa application form


